Today, here we have very beautiful and colorful puff, daisy coasters for you to crochet with your hands and make your home interior fresh and cute. If you are free, you can start crocheting now, and in a few minutes, you will have an item that will protect your table and also decorate it. If you are a beginner, don’t be afraid, it’s very easy to crochet. Good luck, and please enjoy. Just follow this clearly and step by step explinaed written pattern,n and you will get perfect results.
📌 Pin It!
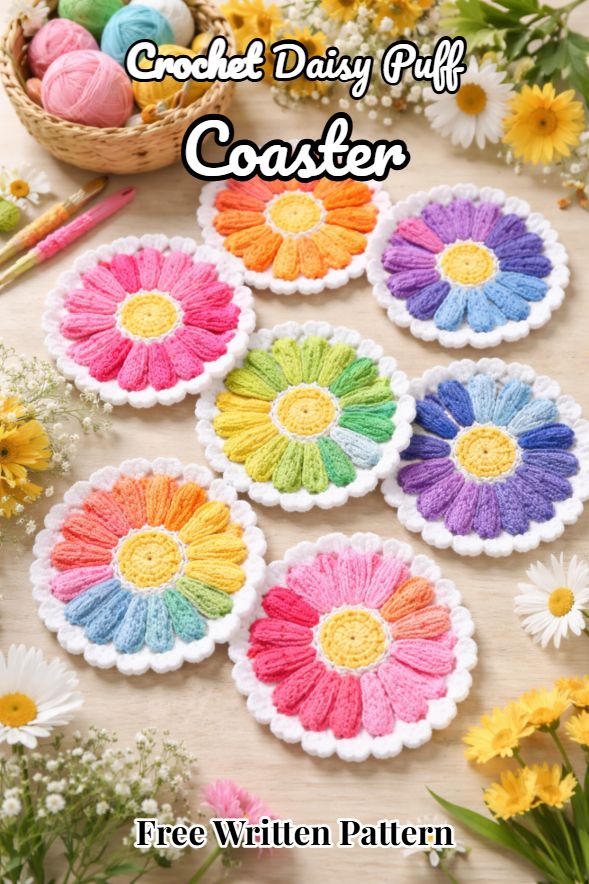
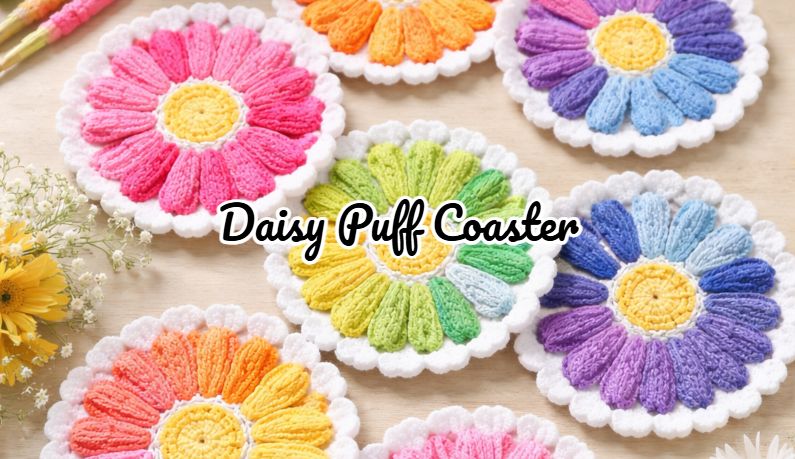
Daisy Puff Coaster 🏵️
You’ll need
-
3 colors of yarn: center (yellow), petals (any bright color), border (white)
-
4.0–5.0 mm crochet hook (use what matches your yarn)
-
Scissors, yarn needle
Stitches (US terms)
-
ch = chain
-
sl st = slip stitch
-
sc = single crochet
-
hdc = half double crochet
-
dc = double crochet
-
puff stitch (puff) = explained below
Puff stitch (easy version)
Yarn over, insert hook in stitch, pull up a loop (3 loops).
Yarn over, insert again in the same stitch, pull up a loop (5 loops).
Yarn over, insert again, pull up a loop (7 loops).
Yarn over, pull through all 7 loops, ch 1 to “lock” the puff.
Round 1 (center)
With yellow:
-
Make a magic ring (or ch 4 and join to form a ring).
-
Ch 1, 12 sc into the ring.
-
Join with sl st to first sc.
Fasten off.
(You should have 12 stitches.)
Round 2 (petals base)
With petal color:
-
Join yarn in any stitch.
-
(ch 2, sl st in next stitch) Repeat all around.
-
Join to the first ch-2 with sl st.
(You’ll have 6 little chain spaces — each will get a puff petal.)
Round 3 (puff petals)
Still with petal color:
-
Sl st into the first ch-2 space.
-
In that same space: (puff, ch 2)
-
Repeat (puff, ch 2) in each ch-2 space around.
-
Join with sl st to the top of the first puff.
Fasten off.
(You should have 6 puff petals. If you want it fuller like the photo, do 8 petals instead—see note below.)
Round 4 (white border + scallops)
With white:
-
Join yarn in any ch-2 space between petals.
-
In each ch-2 space around, do: (sc, hdc, dc, hdc, sc)
(This makes one rounded scallop.) -
After the last scallop, join with sl st to the first sc.
-
Fasten off and weave in ends.
Make it match the photo (more petals)
The photo looks like more than 6 petals (often 8–12). Easiest upgrade:
Better petal count option (8 petals)
-
Round 1: do 16 sc (instead of 12).
-
Round 2: do (ch 2, sl st next) all around → gives 8 spaces
-
Round 3: puff in each space → 8 petals
-
Round 4: same scallop border.
(If you want 10 petals: Round 1 = 20 sc. If 12 petals: Round 1 = 24 sc.)